Guide to Attic Ladder Installation
If you are considering investing in an attic ladder, great idea!
An attic ladder is a smart addition to any home, as it provides first and foremost, safe and simple roof space access. Whether it be for yourself, the pest controller, the air conditioning service person, or any other trade, accessing the roof space will never be easier.
Another extremely popular use for an attic ladder, is the opportunity to use the roof space for storage. The roof space is often an unused space within the home and once unlocked and easily accessed, can become a very useful storage area.


Roof Space Renovators are suppliers and installers of the largest range of attic ladder brands and models on the Australian market.
Although we provide an attic ladder installation service, we thought it might help to outline the process, in case you decide you would like to give the installation a try yourself. It is important to note here though, that an attic ladder installation requires similar skills to those needed for installing a window or a door frame. You also require some knowledge regarding structural and non-structural roof space components.
If you are up for the challenge, our range of attic ladders are available for purchase by DIY enthusiasts, carpenters and builders. We have a number of brands and models on display in our Showroom, located at 5/53 Lawnton Pocket Road, Lawnton Qld 4501, for you to ‘try before you buy’.
Before You Begin
If you are still reading, you probably just want to get cracking on purchasing an attic ladder and commence installing it. You may have even already purchased an attic ladder and just want to skip through to the installation instructions. However, there are a few important aspects to consider, prior to getting your tool belt on.
Determine The Intended Use For The Attic Ladder
An attic ladder is an addition to the home, therefore you want it to not only meet your aesthetic expectation but also serve its purpose. The last thing you want to do is install an attic ladder and then find it becomes unsuitable for your needs.
Therefore, we suggest that you imagine you already have an attic ladder installed in your home. Then ask yourself a few important questions:
- How often am I using the attic ladder?
- What am I using the attic ladder for? (Occasional roof space access for trades OR more regular access for stored items?)
- Is my attic ladder timber or aluminium and why? For an aesthetic reason or for strength?
- How easy is my attic ladder to operate?
- What does the hatch look like when the attic ladder is in its closed position?
With multiple attic ladder brands, models and price-points on the market with various features, it is important to know what you require and get the decision right in the first instance.
Initial Inspection / Measurements
(An attic ladder is not a ‘one size fits all’ product. Likewise, one home is different to the next).
Therefore, you will need to establish the position for your attic ladder. This does involve a careful inspection of the proposed attic ladder location, including the collection of a number of measurements, in order to ensure your chosen attic ladder will fit your home.
During your inspection, you will need to look out for obstructions in your roof space. Some obstructions that commonly hinder an attic ladder installation include but is not limited to:-
- Electrical Cables
- Plumbing pipes
- Structural roof members
- Air Conditioning Ducting
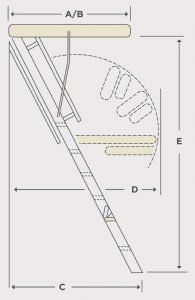
To ensure your chosen attic ladder will fit into your home, the collection of the following measurements are required:-
- Floor to ceiling height (E)
- Distance between ceiling joists / trusses (A)
- Foldout measurements (D)
- Standout measurements (C)
- Maximum Frame length (B)

Tools and Materials Required
You will need a number of tools and materials in order to conduct your attic ladder installation. Below is a comprehensive list of items that may be required to install your attic ladder.
Tools
- Circular saw
- Drill
- Hacksaw
- Hammer
- Ladder
- Nail gun
- Packers
- Pencil
- Plasterboard saw
- Reciprocating saw
- Saw
- Saw horses
- Set square
- Spirit level
- Tape measure
Materials
- Attic ladder
- Framing timber
- Screws
- Architrave
Attic Ladder Installation
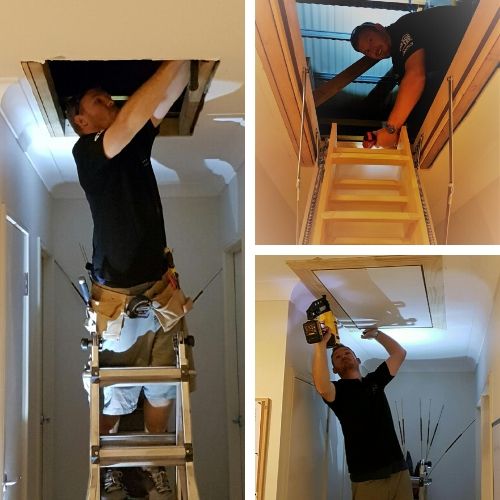
There are many ways to install an attic ladder, therefore it is important to note that we are only providing a general attic ladder installation guide here. Installation does vary depending on whether are you extending an existing manhole or whether you are installing the attic ladder into a closed ceiling. Installation will also vary, depending on the attic ladder brand and model purchased. For the purpose of this guide, we are going to provide guidelines for the installation of a basic ‘occasional-use’ attic ladder and assume the ceiling is closed and a new hole is being cut from scratch to make way for the attic ladder frame. You may even find that a second person is required to assist lifting the ladder into the overhead space.
Step 1. Prepare The Opening
It is now time to prepare the ceiling. Please note, you will need to be familiar with the frame / cutout measurements of your attic ladder. This step will commence within the roof space and involve creating reference points, to assist the cutting of the ceiling from beneath. At the installation location, drill holes into the ceiling at the points where length meets width edge points. From beneath the ceiling, using a set square draw the rectangle on the ceiling with a pencil. It is a good idea to double check that your rectangle is the right size prior to moving on to the next step.
Step 2. Cut The Opening
Cut along the pencil lines with a plasterboard saw. At this point, it is only the gyprock you should be cutting. Non-structural ceiling joists can be left in place for the time being. Then remove the plasterboard within your cutout area.
Step 3. Cut Ceiling Joists
Once the gyprock is removed, it is now time to cut the ceiling joists / rafter battens. As mentioned already, if you are unsure of the difference between structural and non-structural timbers, you are best to either leave the installation to a professional or call in a professional for guidance.
Step 4. Create Framework Around Opening
Create frame within joists to position ladder. Do this by measuring and cutting noggins. Noggins are horizontal pieces of timber that are fit around the frame and are fixed to the bearing boards. Ensure that the frame is square and that the diagonals are the same. Make sure your framework is securely fixed, as your framework is what the attic ladder will be attached to. This will prevent the ceiling from sagging.
Step 5. Get Ladder Into Position
Prior to lifting your ladder into the opening, you will need to decide on a method to use, in order to hold the ladder in place temporarily. This step also depends on the attic ladder model being installed. It is easiest if you have someone help you lift the ladder into position. You may install some scrap pieces of timber or cleats to the ceiling in order to hold the ladder frame temporarily in place. Once in place, ensure the ladder is level.
Step 6. Screw Into Place
Carefully pull down the hatch door, so you can access the inside of the attic ladder frame. It is important to ensure the ladder casing is square and packed prior to permanent fixing. The frame needs to be packed tightly to avoid it moving out of square. It is now time to secure your attic ladder into place.
Step 7. Measure And Cut Ladder To Length
Fold the bottom section behind and measure from the lower edge of the middle section to the floor, on the same angle the top and middle section of the ladder are on. Then cut the required amount off the bottom step with a handsaw. If your ladder has plastic or rubber feet ensure you take this into consideration with your measurements.
Step 8. Finishing Touches
Now go back and tighten all fittings, nuts and bolts. Screw in any screws that may have been missed because the ladder was folded up. After ensuring everything is square and the ladder closes okay, remove your temporary blocks or cleats. To finish, neatly install architrave to your attic ladder. You are now done!!

An attic ladder is an investment, it is an addition to your home. If you are feeling unsure about the installation process, we are happy to help. Give us a call, or perhaps visit our purpose-built showroom, located at 5/53 Lawnton Pocket Road, Lawnton Qld 4501. We are more than happy to discuss and/or show you through our range of installed attic ladders. Our showroom provides the opportunity for you to close, open and climb the attic ladders, just like you would in your own home. We stock a number of attic ladders ready for pickup, by DIY enthusiasts, carpenters and builders. However, for those choosing to leave the hard work up to us, we offer an in-home consultation to discuss your requirements, take some measurements, provide our recommendation and of course a fixed price quotation.

Roof Space Renovators’ service Brisbane, Sunshine Coast, Gold Coast, Ipswich (and all areas in between).
Roof Space Renovators’ Specialise in – Attic Ladders, Attic Room, Attic Living, Attic Storage, Skylights & Roof Windows
Contact Roof Space Renovators’ for an obligation free consultation –
Phone – (07) 3889 6688
Email – [email protected]
Website – https://roofspacerenovators.com.au/


